Pay an Invoice
To Pay an invoice, you must be on the Receivables Data Display Tab. Using one of the Data Access Tabs search and select the invoice you wish to pay. Change the Interest Date to reflect the postmark date, if applicable (see Change Interest Rate). On the Toolbar, click the Pay button. The Pay Invoice dialog box displays. If you do not accept Electronic tender types, you will not see the Electronic radio button. To enable the Electronic tender type, see Rates, Fees, Deposit Tab.
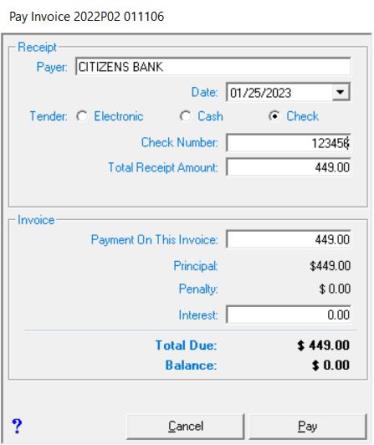
The Receipt section of the Pay Invoice dialog box is used to enter the information regarding the payment received. This tells the system who paid the bill, on what date, with what tender type, and the total amount received.
The Payer text box defaults to the property owner, however, if a mortgage company is submitting the payment, you should change this to reflect who actually is paying this invoice. The Payment Date text box is populated with the date you selected, or if you did not change the interest date on the program's main screen, the system will default to the current date. If you need to change this date click on the dropdown arrow to display the month date picker and select the date.
With the EFT payment option enabled, you will have to select a tender type radio button (Electronic, Cash, Check) when you pay an invoice. When you select Electronic as the tender type, a dropdown text box displays allowing you to select the type of Electronic payment you received. By selecting the type of electronic payment used, the system captures the information and adds a total at the end of the deposit report summarizing the amounts by each electronic tender type. This is useful when balancing with credit card companies. If the EFT payment option is not enabled, you will only see the Cash and Check payment options.
The Invoice section of the Pay Invoice dialog box is used to enter the information regarding the bill you are paying. This information is automatically populated based on the invoice selected and the information you entered in the Receipt section.
The date you selected as the Payment Date is used to calculate, and populate, the interest text box. You can change the interest amount by typing the amount you wish to charge in the text box, however, any interest you change is audited and recorded on the Uncollected Interest report. The Payment On This Invoice text box allows you to pay a portion of the payment received to this invoice and the rest to another invoice (seePay Multiple Invoices). After all information is correct, click the Pay button to apply the payment.
The system will prompt you to print a receipt. The default methodology for printing receipts at the time of payment is intended to be a quick method of providing the customer the basic details of their payment. As such, the emphasis, at the time of payment, is on speed and efficiency. However, we recognize some users mail receipts more frequently and would like the opportunity to select or enter the address the first time when the receipt prints. For these users, there's an option with which you have the additional flexibility to select or enter the appropriate mailing address for a receipt at the time it is originally printed. To enable the address prompt on the receipt upon payment, navigate to Utilities | Town Settings | Miscellaneous check the box "Receipts: Print Address Input After Payment" and save your changes. If this is not enabled, the above address behavior will remain unchanged – there are no extra message boxes or options, just a simple click and print and the receipt is in the customer’s hand.
If you do not want to print a receipt, click the Cancel button on the Print dialog box. Otherwise, click OK to send the information to the printer.

|
|