Lien Notice
RSA 80:60 states, “The collector shall give notice of the impending lien at least 30 days prior to the execution of said lien. Notice shall be sent by certified or registered mail return receipt requested, to the last known post office address of the current owner, if known, or of the person against whom the tax was assessed. The notice shall state the name of the current owner, if known, or the person against whom the tax was assessed, the description of the property as committed to the tax collector, the date and time on which the last payment shall be accepted, and the amount of the tax, interest, and costs to the date of executing the tax lien. The returned receipt or the returned unclaimed notice shall be prima facie evidence that the collector has complied with the notice requirements of this section.”
Before you begin the Tax Lien Notice process, there are a few things you should do. The first is to import any change of ownership or address changes from Assessing (see Get Assessing Owners). After you send the lien notices, do not import changes from Assessing until after the lien execution, as the person you send the notice to must be the person you lien. The next step is to create a backup (see Backup Database). If a problem arises during the lien process, we can restore your data from this backup.
To create the lien notices choose Utilities | Lien Notice. The Lien Notice dialog box displays. Note: The dates displayed are the dates you entered the last time you created a new group.
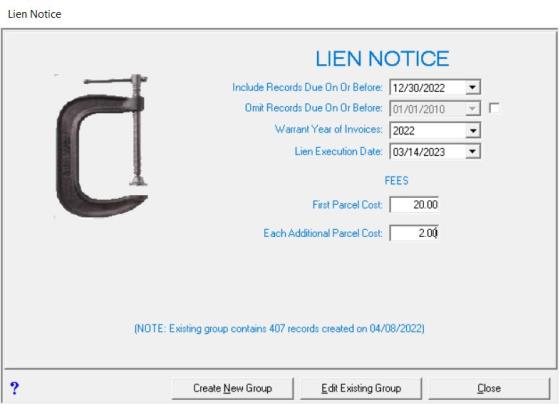
Fill in the information as follows:
- Include Records Due On Or Before: This date tells the system what records should be included in this notice. The date should reflect the due date of the final bill of the year. For example, if your fall bills were due January 5th, you would want the date 01/05/20xx. Be sure to include any supplemental warrants that may have been issued with a due date after your fall billing.
- Omit Records Due On Or Before: This date is not used often, therefore, it is grayed out making the field inactive. If you have any questions regarding this option, call Avitar.
- Warrant Year of Invoices: This should be the levy year you want to lien. The system defaults to All, but if do not want to include past years invoice that have not been liened, you should select only the year in which you wish to lien. For example, if you wish to lien all 2022 warrants, you would select 2022 from the dropdown menu.
- Lien Execution Date: This is the date on which you intend to execute the lien, which must be at least 30 days from the lien notice being mailed.
- Fees: Put in appropriate fees from the latest Fee Schedule issued by the NHTCA. If you do not have the fee schedule and wish to obtain the most up to date amounts, go to the NH Tax Collector’s website at nhtaxcollectors.org.
Once the information is complete, select Create New Group. Note, if you created a group previously and posted expenses, you can select Edit Existing Group to reprint notices. After answering several questions, the Lien Notice dialog box displays. Select the mail date and then Print Lien List. Review the list to verify all the information is correct.
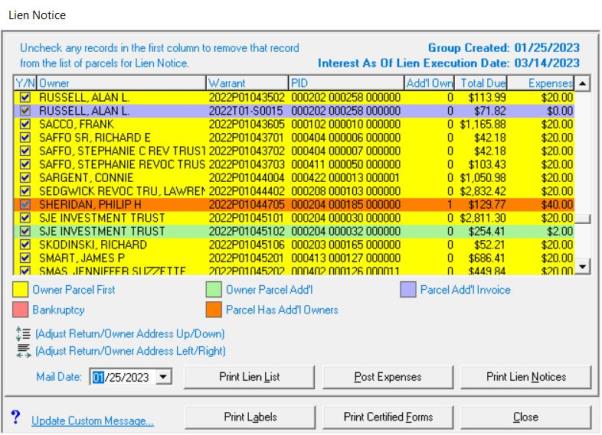
Adjust fees if necessary. Adjusting fees may be necessary for several reasons, but the most common is when the same ownership in property was entered, but the names were input slightly different (e.g. middle initial, period, etc.). This would create two records for this individual, showing cost of $20.00 for each parcel. You would need to make the second parcel a fee of $2.00. To change the fee, click on the fee to be changed in the grid and type the new fee. Reprint the list when changes are complete and keep with your copy of the Lien Notices. Should you choose to exit the Lien Notice procedure, your dates will be saved automatically. When you decide to go back into the process, simply choose Edit Existing Group.
After printing the list and updating any cost, select Post Expenses to place the appropriate costs on each account notified. The Expenses must be posted before you are allowed to print the notice.
You can create a message to be included on the lien notice by selecting Include Custom Message (see Custom Messages). Once you are sure everything is correct, select Print Lien Notices. After the letters display on the screen, verify all the dates are correct and print the notices (see Printing). Make a copy of each letter to keep for your records. If you wish to use the system to print your Certified Forms, select Print Certified Forms and fill in the appropriate fees. Otherwise, you can select Print Labels.
This process should be used as a guideline, and not as a replacement for understanding the process.
NOTE: To turn off the “… require bank/certified check, cash in last days before Lien/Deed Execution”:
-
Utilities | Town Settings
-
Miscellaneous tab
-
Notice Format tab
-
Check/Uncheck the box “Do NOT require bank/certified check, cash in last days before Lien/Deed Execution” box.
-
Make sure all payments are posted and deposited.
-
Make note on calendar to turn off online Tax Kiosk payments and only accept cash or bank checks/money orders two weeks prior to your Lien Execution date (see instructions at bottom).
-
GET ASSESSING OWNERS
-
Click Utilities | Get Assessing Owners | Verify Billing History For All Invoices | Import.
-
DO NOT import again until AFTER executing Lien as the person you send Lien Notice to must be the person you Lien.
-
-
Check for supplements and verify due dates for any unpaid.
-
PRINT LIEN NOTICES:
-
Click Utilities | Lien Notice | Gray Dialog Box Displays:
-
Include records Due on or before: should be the end of your fiscal year. OR, if the due date of your 2nd issue bills or supplements fall into a later month, use that due date.
-
Warrant Year of Invoices: the warrant year you are liening
-
Lien Execution Date: the date you will execute the lien
-
Update Fees - Check: nhtaxcollectors.org for the most up-to-date fees.
-
-
BEFORE you create a New Group, check the date the last group was created. You may need to just Edit Existing Group.
-
Colorful screen = penalties/expenses NOT posted.
-
Gray screen = lien notice expenses have been applied.
-
-
CREATE NEW GROUP:
-
Read and answer Dialog Boxes as they display.
-
Verify the information to make sure you are seeing all the outstanding invoices. If you supplemented in Utility bills, are they included?
-
Change Mail Date.
-
Update Custom Message to include Doolan verbiage on the back of the letter OR include as an insert. Use one of the following:
-
NOTE: IF YOU HAVE FILED FOR BANKRUPTCY, PLEASE SEE IMPORTANT INFORMATION ON BACK OF BILL. -or-
-
NOTE: IF YOU HAVE FILED FOR BANKRUPTCY, PLEASE SEE IMPORTANT INFORMATION ON THE ENCLOSED INSERT.
-
-
-
Continue to work Left to Right through the following buttons:
-
Print Lien List..
-
Post Expenses: these expenses are for the cost of mailing notices.
-
Print Lien Notices.
-
Print Labels or Certified Forms.
-
-
PRINT LIEN NOTICES
-
Primary Owners & Additional Owners & Additional Mail-Tos: Export PDF of all letters to your desktop via the envelope icon (at the top, left of the screen).
-
Additional Mail-Tos Only - print first, send via REGULAR mail.
-
Primary Owners & Additional Owners Only - print 2nd, send via CERTIFIED mail.
-
NOTE: If you accept online payments, you should turn off the ability to pay unpaid invoices (what you are liening this year) two weeks prior to Lien Execution:
-
Click Utilities | Internet Kiosk | Upload Data to Kiosk
-
Select View/Edit Kiosk Messages.
-
Select your town from dropdown menu.
-
Log in.
-
First screen displays warrants. Any warrant checked can be paid online.
-
UNCHECK everything you DO NOT want them to be able to pay online.